In the light of recent news that
Docker Desktop for Windows and macOS is no longer free, efforts have been put in to search for a replacement.
Docker Desktop?
Docker Desktop used to be Docker Toolbox, which is based on VirtualBox. Docker Desktop is able to utilize Hyperkit on macOS which makes the performance much better compared to Type II hypervisor.
In my mind a good in-place replacement should be:
- Runs single Dockerfile
- Supports volume mounting and port forwarding
- Runs docker-compose.yml
- Easy to setup
- Supports Windows and macOS(Docker Engine on Linux remains open-sourced)
- Works with built-in debugger for common IDEs(IntelliJ & VSCode)
- Works with IDE's built-in support that's based on Docker socket
- Supports ARM Mac
Common replacements proposed includes:
- Podman: a Redhat-backed solution that runs on OCI. Spins up a Podman-flavored VM. Very limited support for Docker-Compose. Probably requires reworking Dockerfile. Volume mounting is painful. Cannot be used with IDE's built-in support.
- Microk8s & k3s: Kubenetes. Won't work with Docker-Compose.
Multipass
This is where Multipass comes to shine:
- Utilized Hyperkit, Hyper-V, and Virtualbox for best performance
- Handles volume mounting nicely
- Easy to setup
- Networking is easy
- Volume mounting is simple – at least when using Hyperkit
- Native ARM support
Downsides include:
- Ubuntu. Not even Debian. Bad news for CentOS lovers.
- Overlapping function with Vagrant. Can't deny that.
The actual setup
Steps based on macOS Catalina, 10.15.7.
Install Multipass
Download installer
here. You DO NOT need to set driver as VirtualBox – leave it as is and Hyperkit will be used as default!
You can try running brew install multipass.
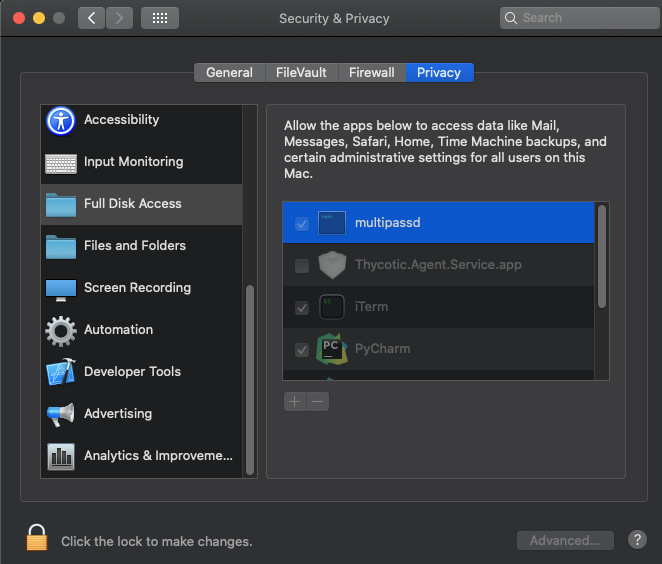
Make sure that you give multipassd Full Disk Access – otherwise mounting will fail!

Create and setup your instance
I am calling my instance as
fakedocker.
Note the default disk size is merely 5GiB – not enough for setting up Docker. To give it a bit more space:
multipass launch fakedocker -d 20G
Use -c to add more CPU cores, -m to add more RAM. Documentation
One-liner with cloud-init
You may want to change Docker-Compose's version to the latest.
Save this file as cloud-init.yaml, and run:
multipass launch fakedocker -d 20G --cloud-init cloud-init.yaml
#cloud-config
apt:
  sources:
    docker.list:
      source: deb [arch=amd64] https://download.docker.com/linux/ubuntu $RELEASE stable
      key: |
        -----BEGIN PGP PUBLIC KEY BLOCK-----
        mQINBFit2ioBEADhWpZ8/wvZ6hUTiXOwQHXMAlaFHcPH9hAtr4F1y2+OYdbtMuth
        lqqwp028AqyY+PRfVMtSYMbjuQuu5byyKR01BbqYhuS3jtqQmljZ/bJvXqnmiVXh
        38UuLa+z077PxyxQhu5BbqntTPQMfiyqEiU+BKbq2WmANUKQf+1AmZY/IruOXbnq
        L4C1+gJ8vfmXQt99npCaxEjaNRVYfOS8QcixNzHUYnb6emjlANyEVlZzeqo7XKl7
        UrwV5inawTSzWNvtjEjj4nJL8NsLwscpLPQUhTQ+7BbQXAwAmeHCUTQIvvWXqw0N
        cmhh4HgeQscQHYgOJjjDVfoY5MucvglbIgCqfzAHW9jxmRL4qbMZj+b1XoePEtht
        ku4bIQN1X5P07fNWzlgaRL5Z4POXDDZTlIQ/El58j9kp4bnWRCJW0lya+f8ocodo
        vZZ+Doi+fy4D5ZGrL4XEcIQP/Lv5uFyf+kQtl/94VFYVJOleAv8W92KdgDkhTcTD
        G7c0tIkVEKNUq48b3aQ64NOZQW7fVjfoKwEZdOqPE72Pa45jrZzvUFxSpdiNk2tZ
        XYukHjlxxEgBdC/J3cMMNRE1F4NCA3ApfV1Y7/hTeOnmDuDYwr9/obA8t016Yljj
        q5rdkywPf4JF8mXUW5eCN1vAFHxeg9ZWemhBtQmGxXnw9M+z6hWwc6ahmwARAQAB
        tCtEb2NrZXIgUmVsZWFzZSAoQ0UgZGViKSA8ZG9ja2VyQGRvY2tlci5jb20+iQI3
        BBMBCgAhBQJYrefAAhsvBQsJCAcDBRUKCQgLBRYCAwEAAh4BAheAAAoJEI2BgDwO
        v82IsskP/iQZo68flDQmNvn8X5XTd6RRaUH33kXYXquT6NkHJciS7E2gTJmqvMqd
        tI4mNYHCSEYxI5qrcYV5YqX9P6+Ko+vozo4nseUQLPH/ATQ4qL0Zok+1jkag3Lgk
        jonyUf9bwtWxFp05HC3GMHPhhcUSexCxQLQvnFWXD2sWLKivHp2fT8QbRGeZ+d3m
        6fqcd5Fu7pxsqm0EUDK5NL+nPIgYhN+auTrhgzhK1CShfGccM/wfRlei9Utz6p9P
        XRKIlWnXtT4qNGZNTN0tR+NLG/6Bqd8OYBaFAUcue/w1VW6JQ2VGYZHnZu9S8LMc
        FYBa5Ig9PxwGQOgq6RDKDbV+PqTQT5EFMeR1mrjckk4DQJjbxeMZbiNMG5kGECA8
        g383P3elhn03WGbEEa4MNc3Z4+7c236QI3xWJfNPdUbXRaAwhy/6rTSFbzwKB0Jm
        ebwzQfwjQY6f55MiI/RqDCyuPj3r3jyVRkK86pQKBAJwFHyqj9KaKXMZjfVnowLh
        9svIGfNbGHpucATqREvUHuQbNnqkCx8VVhtYkhDb9fEP2xBu5VvHbR+3nfVhMut5
        G34Ct5RS7Jt6LIfFdtcn8CaSas/l1HbiGeRgc70X/9aYx/V/CEJv0lIe8gP6uDoW
        FPIZ7d6vH+Vro6xuWEGiuMaiznap2KhZmpkgfupyFmplh0s6knymuQINBFit2ioB
        EADneL9S9m4vhU3blaRjVUUyJ7b/qTjcSylvCH5XUE6R2k+ckEZjfAMZPLpO+/tF
        M2JIJMD4SifKuS3xck9KtZGCufGmcwiLQRzeHF7vJUKrLD5RTkNi23ydvWZgPjtx
        Q+DTT1Zcn7BrQFY6FgnRoUVIxwtdw1bMY/89rsFgS5wwuMESd3Q2RYgb7EOFOpnu
        w6da7WakWf4IhnF5nsNYGDVaIHzpiqCl+uTbf1epCjrOlIzkZ3Z3Yk5CM/TiFzPk
        z2lLz89cpD8U+NtCsfagWWfjd2U3jDapgH+7nQnCEWpROtzaKHG6lA3pXdix5zG8
        eRc6/0IbUSWvfjKxLLPfNeCS2pCL3IeEI5nothEEYdQH6szpLog79xB9dVnJyKJb
        VfxXnseoYqVrRz2VVbUI5Blwm6B40E3eGVfUQWiux54DspyVMMk41Mx7QJ3iynIa
        1N4ZAqVMAEruyXTRTxc9XW0tYhDMA/1GYvz0EmFpm8LzTHA6sFVtPm/ZlNCX6P1X
        zJwrv7DSQKD6GGlBQUX+OeEJ8tTkkf8QTJSPUdh8P8YxDFS5EOGAvhhpMBYD42kQ
        pqXjEC+XcycTvGI7impgv9PDY1RCC1zkBjKPa120rNhv/hkVk/YhuGoajoHyy4h7
        ZQopdcMtpN2dgmhEegny9JCSwxfQmQ0zK0g7m6SHiKMwjwARAQABiQQ+BBgBCAAJ
        BQJYrdoqAhsCAikJEI2BgDwOv82IwV0gBBkBCAAGBQJYrdoqAAoJEH6gqcPyc/zY
        1WAP/2wJ+R0gE6qsce3rjaIz58PJmc8goKrir5hnElWhPgbq7cYIsW5qiFyLhkdp
        YcMmhD9mRiPpQn6Ya2w3e3B8zfIVKipbMBnke/ytZ9M7qHmDCcjoiSmwEXN3wKYI
        mD9VHONsl/CG1rU9Isw1jtB5g1YxuBA7M/m36XN6x2u+NtNMDB9P56yc4gfsZVES
        KA9v+yY2/l45L8d/WUkUi0YXomn6hyBGI7JrBLq0CX37GEYP6O9rrKipfz73XfO7
        JIGzOKZlljb/D9RX/g7nRbCn+3EtH7xnk+TK/50euEKw8SMUg147sJTcpQmv6UzZ
        cM4JgL0HbHVCojV4C/plELwMddALOFeYQzTif6sMRPf+3DSj8frbInjChC3yOLy0
        6br92KFom17EIj2CAcoeq7UPhi2oouYBwPxh5ytdehJkoo+sN7RIWua6P2WSmon5
        U888cSylXC0+ADFdgLX9K2zrDVYUG1vo8CX0vzxFBaHwN6Px26fhIT1/hYUHQR1z
        VfNDcyQmXqkOnZvvoMfz/Q0s9BhFJ/zU6AgQbIZE/hm1spsfgvtsD1frZfygXJ9f
        irP+MSAI80xHSf91qSRZOj4Pl3ZJNbq4yYxv0b1pkMqeGdjdCYhLU+LZ4wbQmpCk
        SVe2prlLureigXtmZfkqevRz7FrIZiu9ky8wnCAPwC7/zmS18rgP/17bOtL4/iIz
        QhxAAoAMWVrGyJivSkjhSGx1uCojsWfsTAm11P7jsruIL61ZzMUVE2aM3Pmj5G+W
        9AcZ58Em+1WsVnAXdUR//bMmhyr8wL/G1YO1V3JEJTRdxsSxdYa4deGBBY/Adpsw
        24jxhOJR+lsJpqIUeb999+R8euDhRHG9eFO7DRu6weatUJ6suupoDTRWtr/4yGqe
        dKxV3qQhNLSnaAzqW/1nA3iUB4k7kCaKZxhdhDbClf9P37qaRW467BLCVO/coL3y
        Vm50dwdrNtKpMBh3ZpbB1uJvgi9mXtyBOMJ3v8RZeDzFiG8HdCtg9RvIt/AIFoHR
        H3S+U79NT6i0KPzLImDfs8T7RlpyuMc4Ufs8ggyg9v3Ae6cN3eQyxcK3w0cbBwsh
        /nQNfsA6uu+9H7NhbehBMhYnpNZyrHzCmzyXkauwRAqoCbGCNykTRwsur9gS41TQ
        M8ssD1jFheOJf3hODnkKU+HKjvMROl1DK7zdmLdNzA1cvtZH/nCC9KPj1z8QC47S
        xx+dTZSx4ONAhwbS/LN3PoKtn8LPjY9NP9uDWI+TWYquS2U+KHDrBDlsgozDbs/O
        jCxcpDzNmXpWQHEtHU7649OXHP7UeNST1mCUCH5qdank0V1iejF6/CfTFU4MfcrG
        YT90qFF93M3v01BbxP+EIY2/9tiIPbrd
        =0YYh
        -----END PGP PUBLIC KEY BLOCK-----
package_update: true
packages:
  - apt-transport-https
  - ca-certificates
  - curl
  - gnupg-agent
  - software-properties-common
  - docker-ce
  - docker-ce-cli
  - containerd.io
  - avahi-daemon
  - libnss-mdns
runcmd:
  - sudo curl -L "https://github.com/docker/compose/releases/download/1.29.2/docker-compose-$(uname -s)-$(uname -m)" -o /usr/local/bin/docker-compose
  - sudo chmod +x /usr/local/bin/docker-compose
  - sudo systemctl daemon-reload
# create the docker group
groups:
  - docker
# Add default auto created user to docker group
system_info:
  default_user:
    groups: [docker]
write_files:
  - content: |
      [Service]
      Type=notify
      # the default is not to use systemd for cgroups because the delegate issues still
      # exists and systemd currently does not support the cgroup feature set required
      # for containers run by docker
      ExecStart=
      ExecStart=/usr/bin/dockerd -H fd:// --containerd=/run/containerd/containerd.sock -H unix:///var/run/docker.sock -H tcp://0.0.0.0:
      ExecReload=/bin/kill -s HUP $MAINPID
      TimeoutSec=0
      RestartSec=2
      Restart=always
    path: /lib/systemd/system/docker.service.d/overwrite.conf
    owner: root:root
    permissions: '0644'
power_state:
  mode: reboot
  message: Restarting after configuring Ubuntu for Docker and Docker-Compose
If having any problem, run multipass shell fakedocker to SSH into the VM. Logs are located at /var/log/cloud-init.log.
Manually set up your instance
Create VM
Use multipass launch fakedocker -d 20G to create the instance.
Run multipass shell fakedocker to get into the instance.
Setup Docker and other stuff
Follow this guide to install Docker: https://docs.docker.com/engine/install/ubuntu/
Also this post-install guide to setup groups: https://docs.docker.com/engine/install/linux-postinstall/
For installing Docker-Compose: https://docs.docker.com/compose/install/
Run sudo apt-get install -y avahi-daemon libnss-mdns to install Avahi to enable Bonjour so you can access the box by fakedocer.local. This will comes in handy in the following setup.
Edit Docker's Systemd config to expose both port and Unix socket: TCP is for remote debugger on your local machine, the socket is for running Docker command locally:
Create a folder at /lib/systemd/system/docker.service.d/ add a file overwrite.conf with the following content:
      [Service]
      Type=notify
      # the default is not to use systemd for cgroups because the delegate issues still
      # exists and systemd currently does not support the cgroup feature set required
      # for containers run by docker
      ExecStart=
      ExecStart=/usr/bin/dockerd -H fd:// --containerd=/run/containerd/containerd.sock -H unix:///var/run/docker.sock -H tcp://0.0.0.0:
      ExecReload=/bin/kill -s HUP $MAINPID
      TimeoutSec=0
      RestartSec=2
      Restart=always
then
sudo chmod 666 /var/run/docker.sock
sudo systemctl daemon-reload
sudo systemctl restart docker.service
to make sure that docker command works on the VM.
Mounting local folder
Run multipass mount ~ fakedocker to attach your home directory to the new VM. This will make sure that you don't need to calculate where you are mounting.
Quick sanity test
On fakedocker VM,
- Run
docker pscommand: Docker should be able to run. You may need to log out and re-login for group change to take effect. - Run
nc -zv 127.0.0.1 2375to make sure that Docker Engine is taking traffic from TCP. - Run
ls /User/<your_username>to make sure that volume attaching is successful: use catto read a file, and write something random to make sure that the attached volume is readable and writable.
On your local machine:
- do a
nc -zv fakedocker.local 2375to make sure that your local debugger can communicate with the Docker instance on fakedocker.
Now you've got a nice environment where you can use
docker
and
docker-compose
as if you are on your local machine.
Setting up Docker on Mac
Run export DOCKER_HOST="tcp://fakedocker.local:2375" or put it in your ~/.zshrc to make the VM your default Docker host.
Follow https://docs.docker.com/engine/install/binaries/ to setup docker command locally, and https://github.com/docker/compose/releases to setup docker-compose.
Setting up remote debugger
I am using PyCharm with Docker-Compose with attached volume in docker-compose.yml as an example:
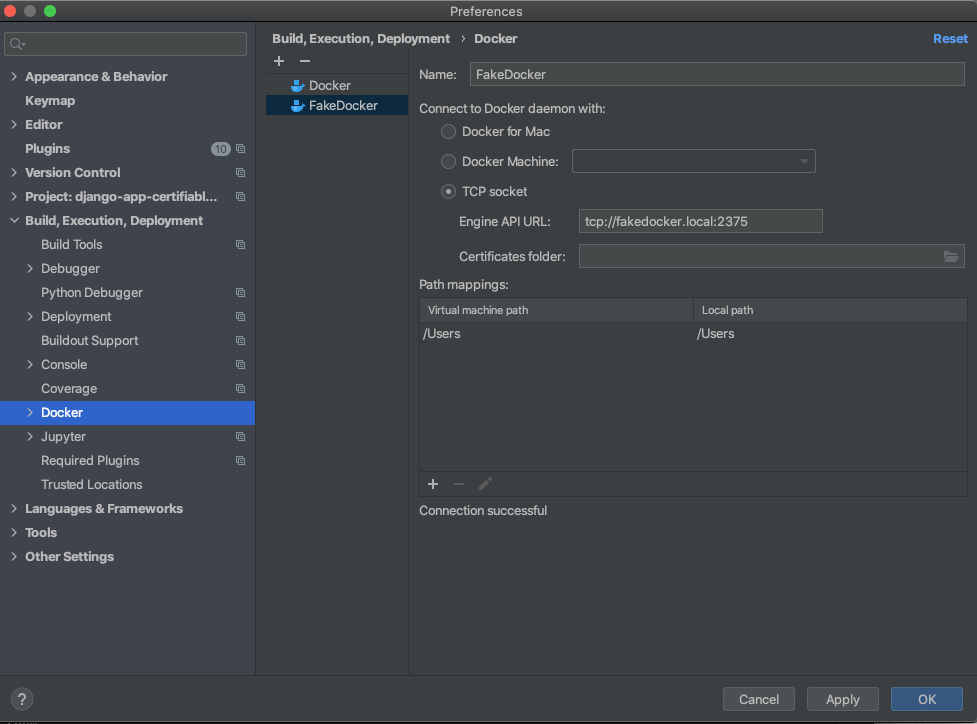
Create a new Docker machine

PyCharm should be able to connect to this instance.
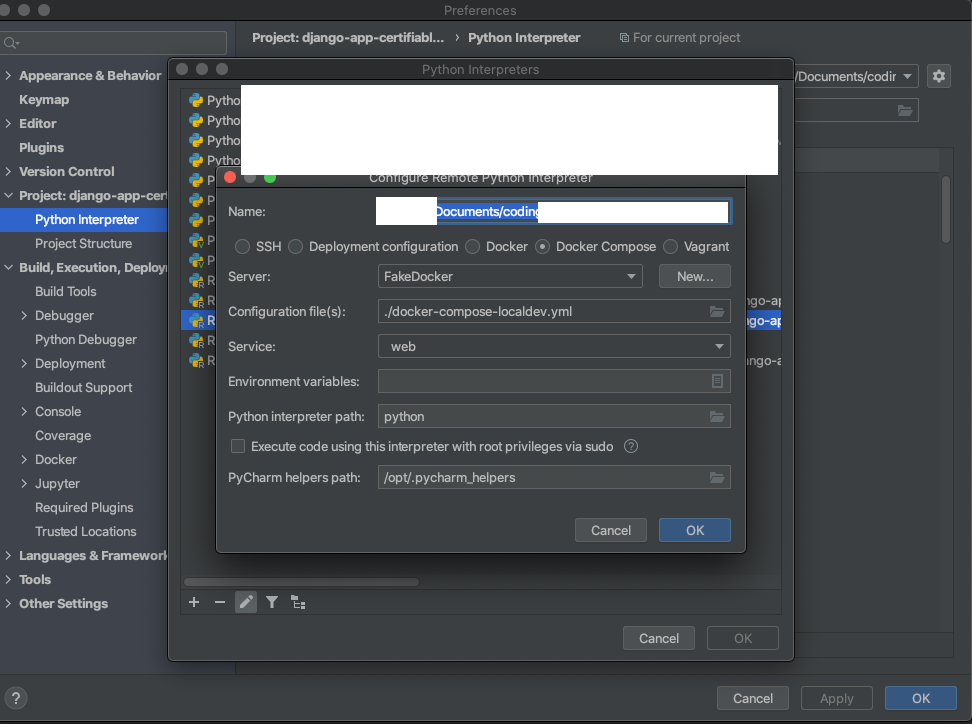
Setup a new Interpreter


Make sure that you do Path mappings as shown: otherwise, debugger won't be able to run.
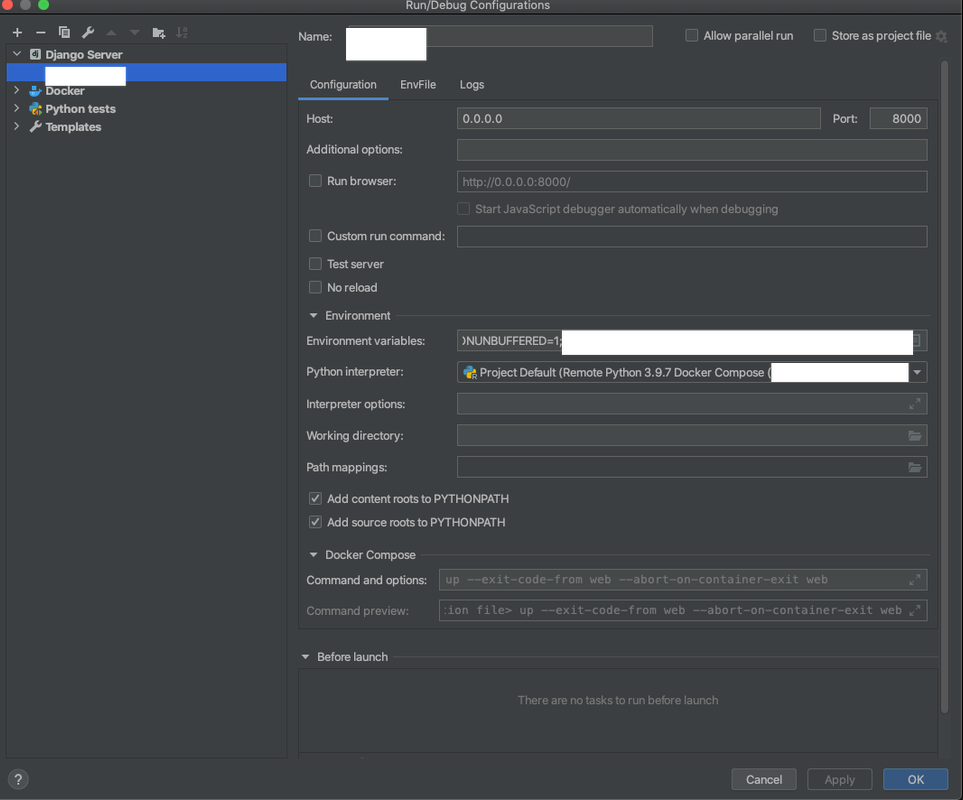
Setup debug config

Listen to 0.0.0.0 - otherwise, you won't be able to visit the web service.
That should be it! Trigger debugging - if you are listening to port 8000, go to http://fakedocker.local:8000 to visit your site. Setup port forwarding in docker-compose.yml if you want to expose more services, like your database.
Common problems
Multipass VM stuck at "Starting"/ Multipass is stuck on any command
Run
sudo pkill multipassd
and redo your last step. multipassd is a daemon that checks VM: killing this process does not change the state of VM. (So what's the point of making it a daemon?)
Multipass VM is botched
Run multipass delete <name_of_vm> && multipass purge to completely remove the VM.
Multipass VM cannot read mounted folder on computer reboot
Reattach the volume:
multipass unmount ~ fakedocker && multipass mount ~ fakedocker.
Cannot connect to remote Docker
Make sure that you've edited Docker's startup command to include TCP listening on
0.0.0.0.
Need to debug issues when using cloud-init
Logs are located at /var/log/cloud-init.log.
docker command on VM won't run
- Make sure that Docker's startup command also listens on Unix socket.
- That socket file needs to be 666.
IDE cannot connect to debugger: cannot find debugger file(especially Pycharm)
Mount your project home to
/opt/project.
Reference
https://github.com/canonical/multipass/issues/913
https://youtrack.jetbrains.com/issue/PY-33489
https://serverfault.com/questions/843296/how-do-i-expose-the-docker-api-over-tcp
https://docs.docker.com/engine/install/ubuntu/
https://docs.docker.com/engine/install/linux-postinstall/
https://docs.docker.com/compose/install/
https://github.com/canonical/multipass/issues/1839
https://github.com/canonical/multipass/issues/1389
https://docs.docker.com/engine/install/binaries/
https://cloudinit.readthedocs.io/en/latest/topics/examples.html
https://cloudinit.readthedocs.io/en/latest/topics/boot.html
https://unix.stackexchange.com/questions/542343/docker-service-how-to-edit-systemd-service-file